User Documentation

Internal Developer Workflow for the DI2E Open Storefront

Reposted with permission

NOTE: I did not write the detailed steps for steps 3, 5 and 6 below. However, I did edit those sections to ensure completeness and cohesiveness. The formatting has been changed to fit the style of this site.

Overview

JIRA is used for all workflow and ticket management and thus serves as the tool of choice for tracking development work. Figure 1 shows the swim lanes in JIRA related to development and provides a reference to the stages in the flowchart in Figure 2.

JIRA Swim Lanes

Figure 1 - JIRA swim lanes.

The general workflow involves picking a ticket from the sprint backlog, assigning yourself to the ticket and moving it to the in process state until finished coding. Each ticket is then tested and merged back into the development branch. The overall feature is regression tested before release.

Best practice is to be working on a single ticket at a time unless the work being done is to fix problems with a previous ticket. Figure 2 shows a more comprehensive flow with specific details for each step given below.

Development Process Flowchart
Figure 2 - Development process flow. Text in ITALICS provided for reference to JIRA swim lanes

Step 1 Details: JIRA Workflow

The data in JIRA can be viewed in a variety of ways. Ask your team lead for access to the common sprint dashboards and backlog views. Tickets can be moved through their various states via the Swim Lanes dashboard or the ticket details view, but the latter provides more details and context when making any changes. The typical workflow for a development ticket is shown in Figure 3. Generally, tickets in the backlog will not have a user assigned to them. When starting a ticket, open the ticket details view and click the Assign To Me link in the People→Assignee section of the ticket before clicking on the Start button to signal that you have started work on a particular ticket.

It is important that the status of a ticket be kept up to date. The comments of the ticket lets it be the primary hub of details and information surrounding the tasks needed to complete the ticket.

JIRA Workflow

Figure 3 - Common JIRA ticket workflow

Step 2 details: GIT workflow

We are following the Git Flow style of branching. This means that Master contains only released versions of Storefront, Develop contains working incremental code, and all active development is done on feature / ticket branches. As most of the development work will be directly traceable to JIRA tickets, figure 4 shows the recommended workflow. Branches are often based on the Develop branch but a senior developer should usually be consulted before choosing which branch to base a new ticket on.

GIT Flowchart

Figure 4 - GIT workflow

IMPORTANT In order for a branch on GitHub to be tracked by JIRA the name of the branch must start with STORE-XXXX where XXXX is the number of the ticket. Thus, if you were working on a ticket numbered store-1234 the name of the branch would start with STORE-1234. Best practice is to keep the branch name short but descriptive (1-3 words is a good goal).

IMPORTANT In order for commits to be tracked in JIRA the first line of the commit message must start with STORE-XXXX where XXXX is the number of the ticket. Best practice is to not use the -m flag when adding a commit and to use a multi-line commit instead. When doing this, the first line of the commit message should contain the STORE-XXXX JIRA ticket number followed by a blank line with the details of the commit following.

Every commit pushed to GitHub will be picked up by our Jenkins Continuous Integration server and a build on that code will be done. (NOTE: setup instructions for Jenkins are in the next step) These builds should be checked to ensure that they are building correctly as these builds will be used for testing later.

GIT Branch Philosophy

Figure 5 - GIT Branches

Master Branch

Follows current release

Develop Branch

Holds the integrated development (CI server is pointed to this)

Feature Branches

Based from development and hold the changes for that feature. Typically, a feature branch corresponds directly to an individual JIRA ticket, but more complicated features can have multiple associated tickets each based on their own "main" feature branch and their own sub-sub-branches.

Branches are merged back into develop via a pull request when they are complete. Branches can be pruned after merging.

Release Branches off Master

Created when the features that are all slated for the release have be completed and we are now in a QA/Bug fix phase. Release branches will get removed after the release is complete and the branch has been merged to Master and pushed back to develop. All bugfixes/adjustment should be made on this branch for the release or branched off of this branch to create pull requests.

Step 3 details: Jenkins / SonarCloud workflow

In this step a few things need to happen. We are using a Jenkins server, this is a server that can build branches from GitHub and report whether or not they passed their build phase. We are also using Sonar Cloud. This is a nice error checker/finder that can report errors and such from the built branches on Jenkins.

Setting up Jenkins

To set up a Jenkins server for your particular branch first navigate to

http://sf-Jenkins.usurf.usu.edu:8080/

and look at all the numbers that are at the end of the names of the built branches. You need to pick a number that is not shown that is less than 15, and not being currently used and remember it, this your port number.

  1. Click new item (top left)

  2. Where it says to enter our name put the branch name followed by the port number, like this:

    STORE-2853_Documenting_the_Code_Review_tool_11

    1. NOTE: The name given to Jenkins cannot contain any spaces. SonarCloud uses the same name as Jenkins and it cannot tolerate spaces in the name.

  3. Near the bottom is a Copy from option, in the provided box start typing "BuildBranchTemplate" and select it when it appears.

  4. Now click OK.

  5. There are a few things that need to be configured in the following window.

  6. First scroll down to Source Code management. We need to put our branch name in the "Branches to build" → "Branch Specifier" box where it says "*/YOUR_BRANCH_NAME" DO NOT INCLUDE THE PORT NUMBER. This is going to query for the specific branch on GitHub.

  7. Now scroll down to the Build Environment Section. There are two "pool name" text boxes. Do you remember that unused port number from before? You need to select the corresponding DOCKERPOOL and DOCKERPORT_SELENIUM numbers to match your port number.

  8. Finally, scrolling down further, you will find the Build section. In the build section is an Execute shell window. Inside this window, near the top are two variables that need to be changed. They are: DOCKERPORT and DOCKERPORT_SELENIUM. You will notice that they are already set to their corresponding names + port numbers. You need match the port numbers with the port number that you chose previously.

    1. For example:

      1. Change:

        DOCKERPORT = $DOCKERPOOL1

        DOCKERPORT_SELENIUM = $DOCKERPOOL_SELENIUM1

      2. To:

        DOCKERPORT = $DOCKERPOOL11

        DOCKERPORT_SELENIUM = $DOCKERPOOL_SELENIUM11

      3. (If eleven was your port number)

  9. That is it. Now save your changes and the branch will start to be built. The save button is at the bottom of the screen (visually).

  10. Now if you return to the Dashboard you will notice that has either built or is in the process of building. If neither just push the "schedule a build" button located at the far right of the dashboard.

  11. Now that your Jenkins server should be running, you can do number of things.

    1. You could go to SonarCloud and see how many errors and/or bugs it has found. Navigate to:

      https://sonarcloud.io/dashboard?id=edu.usu.sdl/openstorefront

      and near the top select your branch that you are currently working on the port number should be included with this. After selecting the branch, you will be presented with a status report and the results of the analysis. Zero issues are a good thing and it is what we are aiming for. Note that "zero errors" means that you have not introduced any new bugs or problems into the code from develop.

    2. You can also go to Portainer

      http://sf-Jenkins.usurf.usu.edu:9000/#/auth

      and login with the standard credentials.

      1. After logging in you can click on the containers button.

      2. From here select from the settings drop down in the top right-hand corner and uncheck "truncate container name"

      3. Now find your branch name in the list, there are two matching branch names, one has a SELENIUM ending and one does not. Select the one WITHOUT the SELENIUM name and "START" it.

      4. You will notice that there is column called "Published Ports", you need to find the entry for your branch that was just started and copy the first given port number and apply it to the following address: http://sf-Jenkins.usurf.usu.edu:90**/openstorefront/Login.action, Where 90** is the first listed port number for the container in Portainer. From that address you can access a running instance of your branch!

Deleting Jenkins and Portainer

In reverse order we are now going to delete the container and the Jenkins build. To do this first navigate to

http://sf-Jenkins.usurf.usu.edu:9000/#/containers/

and select the two corresponding containers for your build, "Branch_name_port number" and the Selenium container. Once both are selected click remove at the top and SELECT "REMOVE NON-PERSISTENT VOLUMES". Now as for Jenkins, first navigate to:

http://sf-Jenkins.usurf.usu.edu:8080/

and find your build that has your branch name, select it and choose the delete project option located in the left-hand corner.

YOUR DONE!

Important Concepts

Jenkins is used to obtain a built instance of our Branch, it can further be used to verify that your branch is being built properly and that it is not because you have special settings on your machine.

SonarCloud is a quick way to check if any new errors / problems were introduced into your build.

Portainer is used to host a live instance of your branch to make testing easier for the tester.

Step 4 details: Write Code

The documentation on GitHub should be consulted for all questions relating to coding standards or expectations. This section covers all those tasks that need to happen beyond just making the new code work. The workflow is shown below.

Code Creation Workflow

Figure 6 - Code Process

It can be expected that multiple developers are working on the code base at any one time. Thus, it is important to update your code base from your base branch before you consider any fix fully implemented.

As we always want to ensure that the Develop branch is usable as a starting point for future work it is important that every developer build, run, and test the entire application locally. Key things to look for are that the expected behavior of the fix is in place and that nothing else appears to have broken. It should only take 10-30 minutes to test the basic functionality of Storefront.

After pushing any needed fixes up to GitHub, the Jenkins server will notice the changes and create a docker container of Storefront with those changes automatically. See the previous step for how to access that container. It is every developers' responsibility to ensure that Jenkins builds correctly and that the SonarCloud analysis tool doesn't show any new issues.

When moving a ticket from being In Process to Code Review JIRA requires that testing steps be added to the ticket. It is the developers' responsibility to create these tests steps and to pay special attention to any setup required from the basic container created by Jenkins (as that is what will be tested).

Step 5 details: Code Review

Here are documented the steps and protocol to follow for code reviews. Before a code review takes place, the developer is working through a Jira ticket on the Kanban board. While they are working though this ticket they will be making commits to their development branch. The standard format make commits is shown in Figure 7 below.

Command Line Screenshot of Commit Process

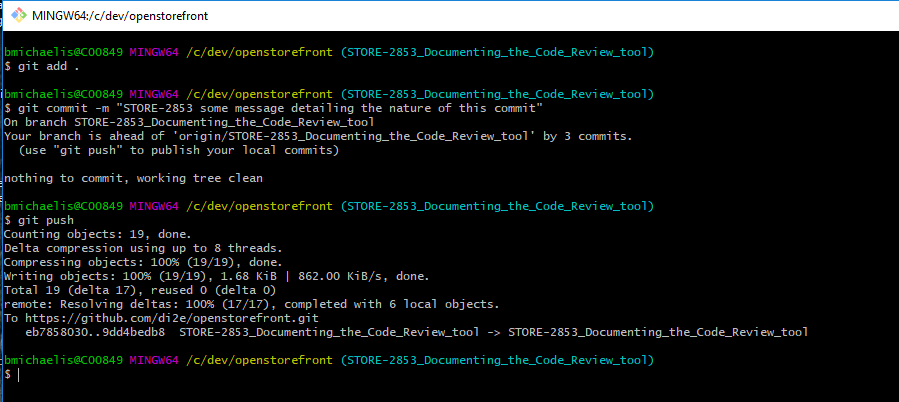
Figure 7 - Example Commit using GIT Bash shell

Notice how the commit message contained the STORE-2853. This is needed for all commits to a development branch.

Creating The Code Review

To create the Code Review, go to the ticket in JIRA and look for the "Development" section, and click on the commits.

When you do that a page will open you then need to select "Create review for all commits". The project should already be chosen (DI2E Storefront Redesign (STORE)) now click the "Create Review" button. The final screen will be the "Edit Review Details" where reviewers can be written in, objectives can be stated, and other info can be reviewed.

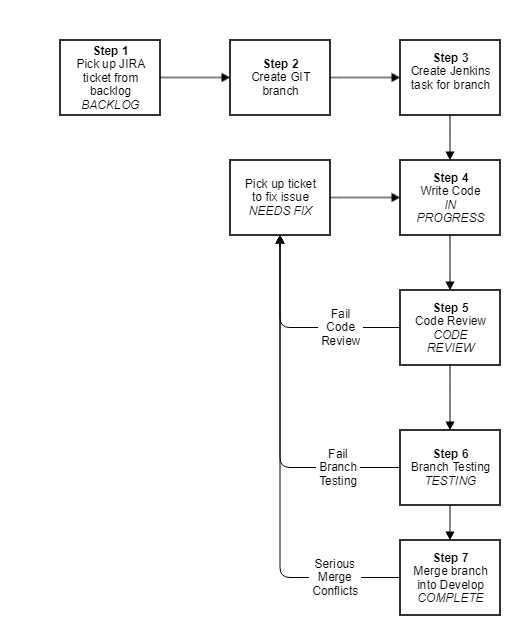
When a developer is ready to have their code reviewed they need to decide who is going to review their code. The developer should place their Jira ticket in the Code Review section of the Kanban board and assign it to the first reviewer. If left unassigned then the ticket should be picked up as appropriate. If unassigned and a reviewer begins the code review, they can assign the Jira ticket to another individual if it is appropriate.
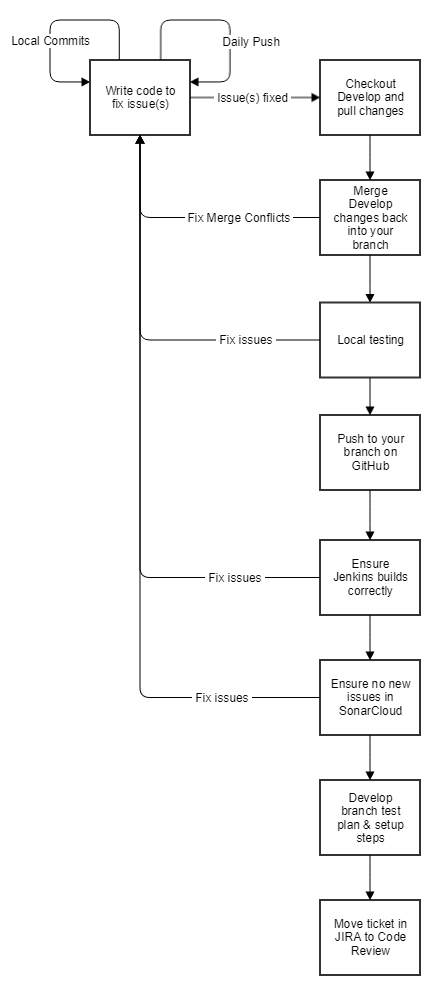
Review The Code

When a reviewer, or multiple reviewers are reviewing the code, all changed files should be reviewed and the checklist below should be followed.

Code Review Flowchart

Figure 8 - Code Review Process Flow

  1. Branch build is passed (Green in Jenkins).

  2. No new issues in Sonarcloud.

  3. It's expected the formatting and basic style is handled by the IDE setting. Check that those were applied. (quick scan) The NetBeans configuration can be found in the documentation on GitHub.

  4. Check Coding Standards ( Front-end and Server)

  5. Check UI against the Style Guide

  6. Check for known business rule breaks (missing cross cutting concerns; regression is expected to catch some of this)

  7. Make sure any required documentation changes are made.

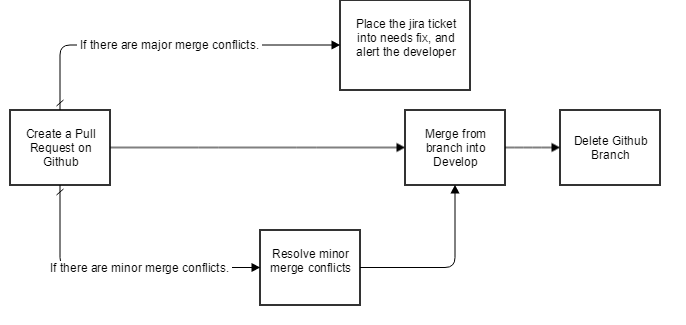
From here there are a few things that can happen as seen in the following flowchart

Post Code Review Flowchart

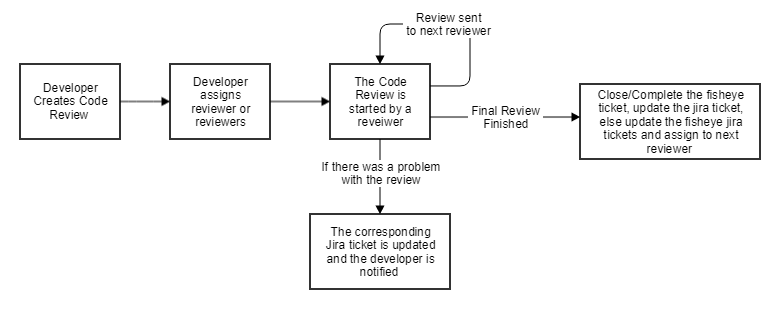
Figure 9 - Code Review Results Workflow

The basic idea is that when a Code review is completed, based on the outcome, tickets are handled appropriately, and individuals are notified. When the last code review is completed the reviewer is now able to close the code review by clicking on the tools option and selecting "close".

Step 6 details: Branch Testing

Test Process

  1. The ticket should have passed code review

  2. Start the appropriate container in Portainer (the container name should begin with the JIRA ticket number).
    1. NOTE: The Selenium container contains an empty database while the non-selenium container is set up with the "golden" data set for easier testing. Unless you know you need an instance of Storefront with an empty database, use the golden data set for testing.
  3. Run any Manual Test process not automated. (Currently, Selenium Tests)

  4. Run through the ticket's test steps

  5. If issues are found; create comments on the main ticket and put into needs fix.

  6. If unrelated issues are discovered create separate ticket for it. (Check with developer, if not sure)

Layers

  1. Unit Tests (Server-side) - Unit test should cover Core libraries and utility classes. Test cases should be added for bug fixes and new features whenever possible.
  2. Integration/Container Tests (openstorefront/test/ServiceTest.action) - These test the server-side service/business layer. They are run on the Integration server as part of the Jenkins build. Integration tests should be added for each new feature.
  3. API Tests - These tests use a client that communicates to the rest API (work in progress)
  4. Acceptance ticket tests - We write this as part of the JIRA ticket for QA.
  5. Regression tests - These are maintained and exercised by the QA team. Regression tests are captured in a separate document. Regression Docs Each ticket should include basic testing instructions to ensure correctness. These cases will be used as a starting point for the formal Regression test.
  6. Auto UI tests will be written using Selenium where ever they make sense.

Roles

  1. Developers:
    • Write and maintain unit tests
    • Write and maintain automated integration tests
    • Ensure all automated tests are passing upon completion of a task
    • Ensure Regression tests for the feature are passing
  2. Testers:
    • Verify all automated tests pass
    • Walk through all Regression and Acceptance tests and verify they pass
    • If a failure is found verify if it is a code bug or test issue if possible.
    • Return to developers providing steps to reproduce failure.

Step 7 details: Merging back to Develop branch

Merging your branch into develop and cleaning up afterwards is the final step before completing the ticket. Here are outlined the various steps on each interface to complete the merge step.

On GitHub

Git Merge Flowchart

Figure 10 - Merge Conflict Resolution Flowchart

  1. Navigate to the Pull Requests tab on GitHub page for storefront and select the branch relating to your ticket.

  2. If GitHub tells you: "This branch has no conflicts with the base branch Merging can be performed automatically." then click on the button to merge the request.

    1. If there are conflicts that are simple to resolve then fix the conflicts and merge the branch.
    2. Otherwise, do not merge the branch. Instead, update the state in Jira to be Need Fix. Once the conflicts have been resolved, the updated code will have to go through Code Review and subsequent processes again.
  3. Once merged, click on the button to delete the branch. If you are cleaning up an old branch, follow the directions on GitHub.

On Jenkins

  1. Navigate to the Jenkins server

  2. Click on the branch name relating to the Jira ticket

  3. Click on Delete Project to get rid of the branch. NOTE: This action cannot be undone

On Portainer

  1. Navigate to the Portainer server and log in.

  2. Click on the Containers section

  3. Select the check box next to the Docker container relating to the ticket

  4. Click on the Remove button. The container does not need to be stopped or paused first. Make sure to select yes for removing non-persistent volumes. NOTE: This action cannot be undone

On JIRA

  1. Open the ticket in Jira

  2. Move the ticket to the Complete state